INTO THE BREACH

Foreword
This post discusses the creation of a 2D space shooter game based on my simple 2D tile engine. The game uses a custom controller that will require 2 BBC micro:bits and a not insignificant ammount of setup to play. The micro:bits offer a more interesting and challenging control input, but I appreciate not everyone will have these available and so I will release a keyboard version of the game soon.
You can view the code and setup instructions here: https://git.jbm.fyi/jbm/INTO_THE_BREACH
The micro:bit code can be found here: https://git.jbm.fyi/jbm/CS5041_P1_Microbit
Due to the amount of user-side setup require to get this running I will not be releasing standalone executables as this would complicate the set up process. However, the keyboard version will include standalone executables making it easy to click and play.
Demo Video
Demonstration video
Abstract
This document discusses an interactive hardware and software prototype game using two BBC Micro:Bit microcontrollers. One of the Micro:Bits acts as a wireless controller, whilst the other is connected to a computer and acts as a receiver. The game is space shoot ‘em up inspired by the classic arcade shooters of the late 70s and early 80s. Instead of using the traditional joystick to control the player’s movement, the user tilts and rotates the controller to provide a more natural control input which allows the player to imagine themselves gripping the controls of a space ship. The hardware used is all built onto the Micro:Bits with the microcontrollers programmed in the (micro)python programming language. The computer software communicates with the receiver Micro:Bit using a serial interface and is programmed using Processing, based heavily on the Java programming language. The aim of the project was to create a fun and interactive game with a unique control scheme, whilst paying homage to the golden age of video games.
Interaction Overview
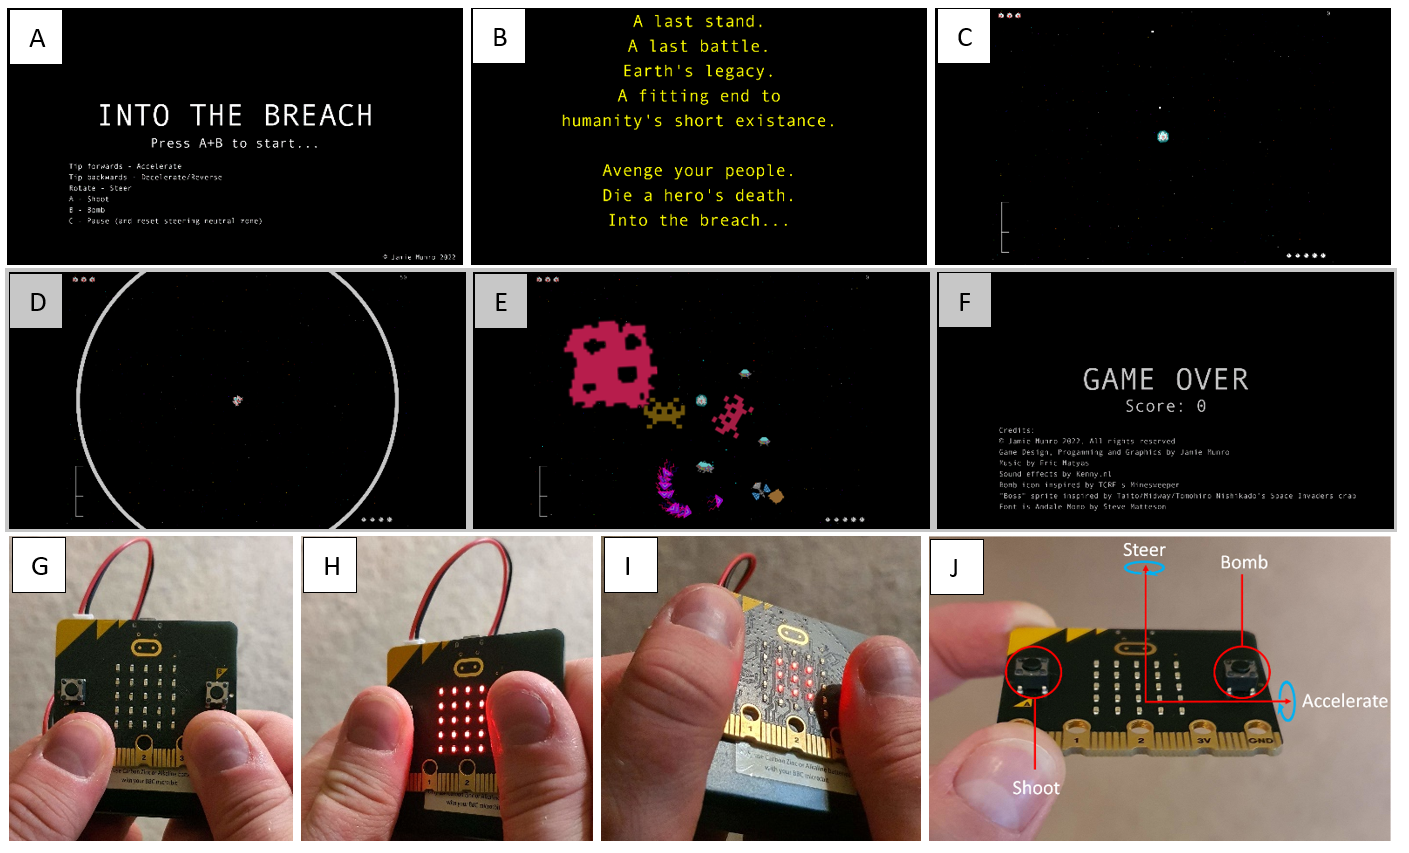
Figure 1 shows how a user might interact with the prototype. Figure 1 parts A – F show the software components of the prototype whilst parts G – J show the hardware components. Part A shows the title screen and part B shows the story crawl. When a user approaches the game, it may be in either of these states. The title screen shows the title of the game, a brief description of the controls and tells the user to press buttons A and B simultaneously to start the game. If the user does not start the game within 15 seconds, the game transitions to the state shown in part B where text crawls up the screen similar to style of the introduction of Star Wars. This text tells the story of the game. The user can return to the title screen at any time by pressing any button on the controller. Parts C – D are screenshots from the game similar to what the user might see when after they start. The player is represented by a starship – which may be shielded (part C) and can shoot (part C), drop a bomb (part D) and will encounter a variety of enemies (part E). Part F is the game over screen shown when the user runs out of lives. It displays the player’s score and credits. The user interacts with the game using a controller implemented with a BBC Micro:Bit. Parts G – I show how the user might use the controller whilst part J is a diagram showing the various inputs on the controller: rotating the controller (about the z-axis) will steer the starship, tilting the controller (about the x-axis) forwards will accelerate, tilting backwards (about the x-axis) will decelerate, the user can shoot with the A button and drop a bomb with the B button. The user can also pause the game using by pressing the Micro:Bit Logo – which will be referred to as the C button.
Parts List
Hardware
- 2 x BBC Micro:Bits V2
- 1 x Micro USB to USB-A cable
- 1 x BBC Micro:Bit battery pack
- 1 x PC (>8GB RAM, reasonably fast CPU, ideally Windows, some issues on Linux, untested on Mac)
Software
- Processing IDE (with appropriate Java Runtime)
- Python 3.x with Pip
- UFlash (install using Pip)
- Text Editor
- Pinta (or alternative graphics program)
- (Optional) Git
Process
The first step in creating the prototype was the design process. I quickly settled on a 2D format, but it took longer to come up with a game idea. Due to this, I first decided to develop a simple 2D tile engine in Java (using the Processing API) that would enable me to load or generate tile-based levels and move a player around that level with the camera centred on them. I soon converted this code so that it could run exclusively within the Processing IDE without using Java features such as non-final static fields (enabling singletons). The code for this engine can be found here: https://git.jbm.fyi/jbm/processing_tile_engine.
Next, I used a sketchpad and coloured pencils to sketch out various ideas. After discovering that the Micro:Bit had accelerometer and compass capabilities I decided I wanted to build a game that took advantage of those features and eventually decided to build a space shooter game paying homage to some of my favourite classic arcade games from the 70s and 80s (Asteroids, Galaga, Galaxian and Space Invaders).
The first step in building the prototype was implementing the controls. I decided to take advantage of the radios built into the Micro:Bits to enable wireless input as it would make interacting with the game easier by avoiding wires getting in the way, and enable the user to get into a more comfortable position. This made two Micro:Bits (and two programs) necessary: a receiver and a controller. I used micropython to program both devices and uflash to flash the programs onto the Micro:Bits.
The receiver runs a fairly simple program that turns on and configures the radio (group, channel, message length, etc) and then begins executing an endless loop where it listens for radio transmissions. Once it receives a transmission, it performs some basic sanity checks – ensuring that the received message starts with the expected control character and is of the correct length. If either of these sanity checks fails, the message is discarded. If both pass, the message is then sent to the connected computer via the serial interface. The receiver code can be found here: https://git.jbm.fyi/jbm/CS5041_P1_Microbit/src/branch/master/receiver.py.
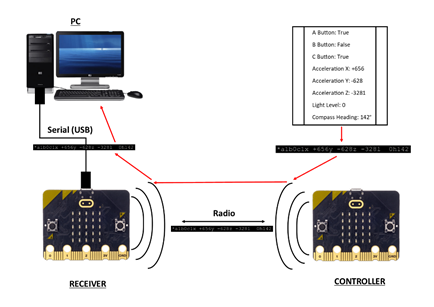
The controller runs a more complex program. It also powers on and configures the radio before entering an infinite loop, however also has the additional step of checking if the compass is calibrated and starting the calibration routine if not. I introduced a slight delay of 4ms in between each iteration of the loop to avoid overwhelming the receiver. Assuming (unrealistically) that each iteration processes instantaneously, this would mean system would be operating at a polling rate of 250Hz equivalent to a PS4 controller. During each iteration of the loop, the controller gathers data readings from each of its sensors and then formats these readings into a 33-character string. All messages are prefixed with a control character (‘*’ in this case) so that the start of a message can be easily identified. The string is then transmitted over radio. Figure 2 shows an example of a string and decodes the components.

In addition to the sensor transmission code, I added an animation displayed on the LED matrix when the user presses the B button (dropping a bomb in the game) to improve user engagement and provide additional visual feedback as it is possible for the user to leave the area of the screen where the bomb is active. In the controller program there is also code to handle this animation, keeping track of which stage the animation is in, the timing in between animation steps and ensure that the animation cannot be interrupted by another click of the B button (as this would be ignored by the game). The code for the controller can be found here: https://git.jbm.fyi/jbm/CS5041_P1_Microbit/src/branch/master/controller.py. Figure 3 shows the Micro:Bit architecture as a whole.
Once the controller system is complete, work on the game itself can begin. First, I used the graphics tool Pinta to build a set of 25 background tiles. These are essential as without a background, it is not possible to perceive that the player is moving. Each tile consists of a black background with a coloured spot. The position and colour of the spot is varied. All tiles are 32x32 images but my tile engine handles resizing them so that they fit a given viewport size. The tile engine also handles adjusting for aspect ratio. A background is randomly generated using mostly empty (black) tiles with a 1% chance of selecting a random tile from the tile set. Once sufficiently zoomed out, the background then gives the impression of a looking down on a galaxy.
I initially represented the player with a rectangle and experimented with receiving input from the controller system. I used the Processing Serial library to receive input from the receiver Micro:Bit and then decoded the input string into a controller class. I eventually settled on using the acceleration about the y-axis for accelerating and decelerating the player, and using compass heading for steering. I tried using acceleration about the x-axis for steering, however found that this was too inaccurate as any player attempting to tilt the Micro:Bit forwards/backwards usually inadvertently tilted the device side-to-side. I had to experiment with many threshold values for both acceleration and compass readings to find values that offered enough precision without becoming too difficult to control. Obviously driving a spacecraft is a difficult task, and so I wanted to make the controls somewhat challenging without frustrating the player.
I originally wanted to use a realistic physics model where the player would only slow down if they decelerated, but found this made the game too hard to control and so I added a friction value to gradually slow the player down if they stopped accelerating, even though there is no such friction in space.
When using the compass to steer, the system needs to know which point the player considers to be the middle: a neutral zone where no steering will occur. However, a player may change their orientation during the game and this middle may change. As a result of this the player needs a way to reset the middle point. I tackled this issue by adding a pause feature which pauses the game (displaying a pause menu and reminding the user of the controls) and resets the steering neutral zone.
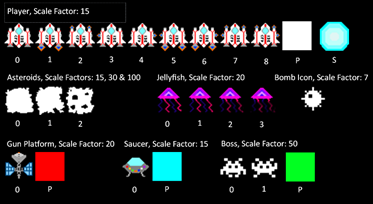
After finding sensible control measures, I then returned to Pinta to create sprites to use in place of rectangles to represent the player. I created 9 player sprites, one for each combination of engine so that the engines firing can be animated. I also created a shield sprite to overlay on the player to show when they are invulnerable, and a projectile sprite that the player can shoot. These sprites, along with the enemy sprites developed later on, are shown in figure 4.
Even with engine animations, it was still hard to keep track of the player’s momentum. In order to make it clearer to the user the direction and magnitude of their momentum, I created a momentum tracker in the bottom left corner of the screen in the form of a bar that fills either green or red (positive or negative) in proportion to the player’s momentum. This further adds to the feel of being in a spaceship. I added additional indicators showing the player’s lives, score and number of bombs to complete the Heads-Up Display (HUD) as shown in figure 5.
Next, I added the first enemy to the game. The first enemy is a simple asteroid that spawns in a random location, with a random rotation and random speed. The asteroid then bounces around the map. The asteroid sprites are white so that a randomly coloured light can be shined on them when they are drawn to the screen. This means that each asteroid has a random colour. I added code to detect if the player collides with an enemy and subtract a life if they do.

Now that there was an enemy to shoot, it was time to allow the player to destroy them. First, I implemented the shoot function which launches a projectile from the player’s location and travels forwards for a predetermined range. If it collides with an enemy, that enemy is loses a health point (HP). If an enemy runs out of HP, it is destroyed and the player collects points. Next, I implemented the bomb function. If the player presses the B button and still has bombs remaining, a bomb is dropped. This is shown on the screen as a circle expanding and contracting from the player’s location, destroying any enemies it comes into contact with.
With the shooting and bombing mechanics in place, I added 6 more enemies. The first 2 were larger asteroids. These asteroids break down into 3 asteroids of the next largest class once destroyed by the player. I also added “Jellyfish” which chase the player, “Gun Platforms” that remain stationary and shoot the player, “Saucers” which chase and shoot the player and “Bosses” which are based on the classic Space Invader’s enemies and chase and shoot the player but require three shots to kill instead of one like the other enemies. Once there were multiple enemies, I had to design a spawning mechanic. I eventually settled on a system where each enemy has a minimum “difficulty level” and a spawn chance. The difficulty level increases every 30 seconds, and every second a random enemy is selected based on their spawn chance with a minimum difficulty level lower than the current difficulty. The enemy spawn in a random location, but cannot spawn inside the player’s viewport. It was at this point that I noticed that a player would often lose all three of their lives before having a chance to react, so I added a shield mechanic where a player has 5 seconds of invulnerability after taking damage or at the start of the game, indicated by the shield overlay.
With the player now able to collect points, I gave the player the opportunity to collect an extra bomb, by reaching a score of 25,000 and an additional life by reaching 50,000. These rewards repeat every time the player collects enough points, but the player can carry no more than 5 bombs, they can, however, have more than 3 lives.
With the basic game built, I set to work making it more user friendly by introducing a title screen explaining the controls of the game; a game over screen listing the credits and the player’s score as well as letting the player start another game without restarting the whole program. I implemented a “Star Wars” style scrolling story screen shown if the player is idle at the title screen for 15 seconds to add additional atmosphere to the game. I also notice that the game spent a noticeable period of time loading assets at the start of the game during which time the screen was grey. To combat this, I moved the asset loading into a separate thread and showed a loading screen whilst this was happening.
The final step in the development process was adding sounds to the game. As I have no musical talent, I found suitable assets for this online. I used the minim library (http://code.compartmental.net/minim/) for sound playback which can be downloaded from the Processing IDE library manager. I implemented a simple subroutine that plays a random song from an array of songs which is called every time the current song stops playing. I found Erik Matyas’s website (https://soundimage.org/) where I was able to download a number of high-quality royalty-free sci-fi themed tracks that add great atmosphere to the game. I also found Kenney’s website (https://kenney.nl/) where they offer a large number of free game assets including sounds. I found suitable sound effects in their Sci-fi sound pack and Interface sound pack. I made sure to credit both creators in the credits section on the game over screen and the project README (see Appendix A).
The complete code listing for the Processing portion of the Game can be found here: https://git.jbm.fyi/jbm/INTO_THE_BREACH. If you’re looking to set up and run the game on your local machine, detailed instructions including troubleshooting tips can be found in the README (see Appendix A).
Challenges
Many of my initial attempts with background tile sets failed because they either couldn’t give the impression of the player moving, or they caused motion sickness. I eventually resolved this by finding the right number of tiles to display, the right percentage of non-empty tiles and the correct sized coloured dot.
The game requires a large number of parameters to be tweaked in order to find the optimal settings. In order to make this process easier and to assist in future development, I moved most of the parameters into a configuration file which is loaded when the game starts.
It was a serious challenge to find spawning parameters that made the game challenging, but not impossible. I experimented with many spawn mechanisms and parameters.
I spent a significant amount of time trying to get sounds working on Linux, but eventually gave up and continued to develop my game on Windows where sounds worked without issue. I found a number of old forum posts on the internet regarding Processing sound issues in Linux, which appear to be related to an inability to link with the native system sound libraries, but the methods described to fix this did not work on my system.
Future Work
I did not use some of the sensor readings included by my controller system, such as the y-axis accelerometer reading and the light level. It would be great to find a way to incorporate these readings into my game. Additionally, the code is set up such that it is fairly easy to add additional enemies, and so the game could always benefit from additional enemies to add more variety and challenge. Another interesting exercise would be to profile the performance (in terms of latency and processing time) of the controller system, and compare this to traditional input methods. It would then be interesting to optimise, possibly by rewriting the programs in a faster language such as C++. Finally, as many of the control inputs used by my game are also available on mobile phones, and processing is compatible with Android, it would be very interesting to port the game over to Android.
Evaluation and Conclusion
Overall, I am pleased with the how the game turned out. It is a challenge to get the hang of controlling the spacecraft and the game gets more difficult as time goes on. The graphics are vibrant and the control mechanism is unique. Playing the game is a great way to kill 5 or so minutes of downtime. This was the first game I have ever built that could be considered (close to) a complete game and I gained a lot of experience in game development techniques, including revising the mathematics of geometry in a 2D space. I also had not had any prior experience with the BBC Micro:Bits or running python on a microcontroller, however I have completed several projects involving Arduinos.
The performance of the game is not great, it requires a rather powerful computer to run and consumes a lot of RAM, and this RAM consumption only grows the longer the game is played for. Some of this can be blamed on the overhead of Processing and Java, but it would certainly be possible to improve the efficiency of the code so that it could run on less powerful systems. This would be particularly necessary when looking at porting the game to a less powerful device such as a mobile phone. The performance requirements of the game are particularly striking when compared to the systems that ran the games inspiring this one – the Atari 2600 had only 128 bytes of RAM!
References
- Processing Reference: https://processing.org/reference
- BBC Micro:Bit MicroPython Reference: https://microbit-micropython.readthedocs.io/en/v2-docs/
- MDN “Square tilemaps implementation: Scrolling maps”: https://developer.mozilla.org/en-US/docs/Games/Techniques/Tilemaps/Square_tilemaps_implementation:_Scrolling_maps
- Maerics Stack Overflow Answer to “HashMap to return default value for non-found keys?”: https://stackoverflow.com/a/7519422
- Pixel Art Graphics Tool Pinta: https://www.pinta-project.com/
- Image Editing Tool GIMP: https://www.gimp.org/
- Audio editing tool Audacity: https://www.audacityteam.org/
- Bomb Icon adapted from Minesweeper mine sprite found here: https://github.com/andreasisnes/Elitekollektivet.Minesweeper.Sprites/blob/master/minesweeper/images/tiles/2000.png but originally from by TCRF's Minesweeper (winmine31)
- “Boss” sprite inspired (but drawn by me) from Taito/Midway/Tomohiro Nishikado's Space Invaders crab (1978)
- Music tracks - Cold Moon, Cyber REM, Dystopic Factory, Escape from the Insane Machines, Light Years, Retro Sci-fi Planet, Sector Off Limits, Terraforming Begins and Trouble on Mercury as well as bomb sound effect by Eric Matyas: https://soundimage.org/
- Player death, asteroid explosion, forward/reverse/rotation engine, shield and shoot sounds effects from Kenney's Sci-fi sounds pack: https://kenney.nl/assets/sci-fi-sounds
- Pause and Resume sounds from Kenney's Interface sounds pack: https://kenney.nl/assets/interface-sounds
PDF version: https://www.jbm.fyi/static/into_the_breach.pdf